I've written about MCP (Model Context Protocol) before — it's a standardized communication protocol that lets AI models (LLMs) talk to external tools and data sources in a consistent way. Without it, if you wanted to connect an AI to Google Drive you'd write one custom integration; to connect it to Notion, you'd write another entirely different one. With MCP, as long as everyone follows the protocol, an AI can plug into virtually anything with ease.
This article won't dive into heavy theory. We'll cut straight to the point, give you a clear picture of how MCP actually works, and then walk you through building one yourself.
Core Architecture: Host vs. Client vs. Server
To really understand MCP, you first need to distinguish its three core roles: Host, Client, and Server.
1. Host (The Application You Talk To)
What is the Host?
Simply put, the Host is the application you interact with directly — it's the AI's "interface."
What does it do?
The Host displays the AI's responses, receives your input, and — most importantly — decides when an external tool is needed and delegates that to its internal Client.
Examples:
- Claude Desktop
- Cursor (the popular AI IDE)
- VS Code (with Copilot)
- A Python script you write yourself (as long as it can run an LLM and call tools)
2. Client (The Internal Liaison)
What is the Client?
The Client is a module embedded inside the Host. Think of it as the Host's internal communications officer.
What does it do?
The Client handles the "handshake" and message-passing. When the Host needs a tool (say, reading a file from Google Drive), the Client connects to the appropriate MCP Server, forwards the instruction, and relays the Server's response back to the Host. A single Host can run multiple Clients to connect to different Servers simultaneously.
3. Server (The Toolbox)
What is the Server?
The Server is what actually provides the tools or data. Think of it as the AI's toolbox or library.
What does it do?
The Server defines its available capabilities — in MCP's formal terminology: Resources, Prompts, and Tools. When it receives an instruction from the Client, it executes the corresponding action (fetching a file from Google Drive, running a Python snippet, searching the web) and returns the result.
Examples:
- Hugging Face MCP Server (search models and papers)
- Google Drive MCP Server (file access)
- Jupyter MCP Server (lets AI run code in your local Jupyter environment)
- A custom Server you build with FastMCP
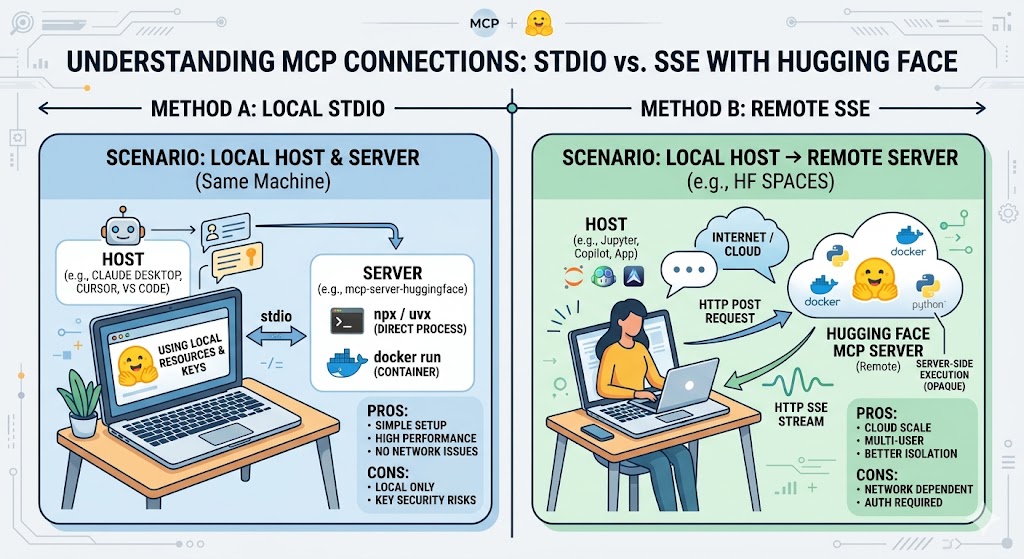
Transport Channels: STDIO vs. SSE
How does the Client inside the Host actually talk to the Server? That's where transport channels come in. The two most common standards are STDIO and SSE, and they're suited for completely different scenarios.
1. STDIO (Standard Input/Output)
This is the most direct, conventional connection method, typically used when both the Host and Server are running on the same machine.
-
How it works:
The Host (e.g., Claude Desktop) launches the Server's executable (or a Docker container) as a subprocess. The Host passes JSON commands through its standard input (stdin) and reads responses from the Server's standard output (stdout). -
Advantages:
- No network configuration needed — no IP address, no port number.
- Excellent performance — local inter-process communication has near-zero latency.
-
Synchronized lifecycle — when the Host closes, the Server process closes automatically with it. No orphaned processes.
-
Disadvantages:
- Can only connect to a Server on the same machine.
2. SSE (Server-Sent Events)
If you want to connect to a remote Server — one hosted in the cloud or on a NAS, for instance — SSE is the way to go.
-
How it works:
This is a standard web technology built on HTTP. The Client (Host) first performs a handshake with the Server. The Server then opens a persistent HTTP stream, through which it can actively push updated data or results to the Client. -
Advantages:
- Supports remote connections — the Server can be hosted anywhere with internet access.
-
Supports multiple clients — one Server can serve many Clients simultaneously.
-
Disadvantages:
- More complex setup: you need to deal with networking, firewalls, port forwarding, and authentication.
Hands-On Examples
Enough theory — let's build something. Here are two simple implementations.
1. FastMCP: Build and Dockerize an MCP Server
This example uses Python's FastMCP library to create a custom Server, packaged inside a Docker container. We use Docker's -i (interactive) flag so the container's Server can communicate with the Host via STDIO.
Step A: Write a simple my_server.py
from fastmcp import FastMCP

# Create a FastMCP instance
mcp = FastMCP("My Cool Server")

# Define a simple tool: addition
@mcp.tool()
async def add_numbers(a: int, b: int) -> int:
    """Add two numbers together."""
    return a + b

if __name__ == "__main__":
    # Start the Server in stdio mode
    mcp.run(transport="stdio")
Step B: Write a Dockerfile
FROM python:3.11-slim

WORKDIR /app

RUN pip install --no-cache-dir fastmcp

COPY my_server.py .

ENTRYPOINT ["python", "my_server.py"]
Step C: Build and launch the container (on the Host side)
In your terminal, build the Docker image:
docker build -t my-mcp-server .
Then add the following to your MCP config file (e.g., claude_desktop_config.json):
"mcpServers": {
  "my-docker-server": {
    "command": "docker",
    "args": ["run", "-i", "--rm", "my-mcp-server:latest"]
  }
}
Claude will now launch the container automatically and connect to it via stdio.
2. Jupyter STDIO: Let AI Control Your Local Jupyter Environment
If you want a Host like Claude Desktop to directly operate your local Jupyter instance for data analysis, use jupyter-mcp-server.
Step A: Install the package
In your terminal:
# Install into your Python environment
pip install jupyter-mcp-server

# Or, if you have uv, run it directly
uvx --install jupyter-mcp-server
Step B: Configure the Host (using STDIO)
Add this to your MCP config file (e.g., claude_desktop_config.json):
"mcpServers": {
  "my-jupyter": {
    "command": "jupyter-mcp-server",
    "args": []
  }
}
Now that you understand the difference between Host, Client, Server, and the two transport channels, you should have a much clearer picture of how MCP actually operates. Whether you're using an existing Server or rolling your own, MCP opens up an enormous space of possibilities for AI agents. Go give it a try!
Comments
Loading comments…
Leave a Comment